
系列文章
七天學會ASP.NET MVC (一)——深入理解ASP.NET MVC
七天學會ASP.NET MVC (二)——ASP.NET MVC 數據傳遞
七天學會ASP.NET MVC (三)——ASP.Net MVC 數據處理
七天學會ASP.NET MVC (五)——Layout頁面使用和用戶角色管理
七天學會ASP.NET MVC (六)——線程問題、異常處理、自定義URL
目錄
實驗22——添加頁腳
實驗23——實現用戶角色管理
實驗24——實現項目外觀一致性
實驗25——使用Action 過濾器讓頁眉和頁腳代碼更有效
總結
實驗22——添加頁腳
在本實驗中,我們會在Employee 頁面添加頁腳,通過本實驗理解分部視圖。
什么是“分部視圖”?
從邏輯上看,分部視圖是一種可重用的視圖,不會直接顯示,包含于其他視圖中,作為其視圖的一部分來顯示。用法與用戶控件類似,但不需要編寫后臺代碼。
1. 創建分部視圖的 ViewModel
右擊 ViewModel 文件夾,新建 FooterViewModel 類,如下:
1: public class FooterViewModel
2: {
3: public string CompanyName { get; set; }
4: public string Year { get; set; }
5: }
2. 創建分部視圖
右擊“~/Views/Shared”文件夾,選擇添加->視圖。
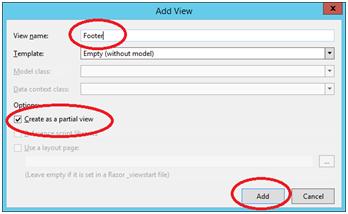
輸入View 名稱”Footer”,選擇復選框“Create as a partial view”,點擊添加按鈕。
注意:View中的Shared 共享文件夾是為每個控制器都可用的文件夾,不是某個特定的控制器所屬。
3. 在分部View 中顯示數據
打開Footer.cshtml,輸入以下HTML 代碼。
1: @using WebApplication1.ViewModels
2:
3: @model FooterViewModel
4:
5: <div style="text-align:right;background-color: silver;color: darkcyan;border: 1px solid gray;margin-top:2px;padding-right:10px;">
6:
7: @Model.CompanyName © @Model.Year
8:
9: </div>
4. 在Main ViewModel 中包含Footer 數據
打開 EmployeeListViewModel 類,添加新屬性,保存 Footer數據,如下:
1: public class EmployeeListViewModel
2: {
3: public List<EmployeeViewModel> Employees { get; set; }
4:
5: public string UserName { get; set; }
6:
7: public FooterViewModel FooterData { get; set; }//New Property
8: }
在本實驗中Footer會作為Index View的一部分顯示,因此需要將Footer的數據傳到Index View頁面中。Index View 是EmployeeListViewModel的強類型View,因此Footer需要的所有數據都應該封裝在EmployeeListViewModel中。
5. 設置Footer 數據
打開 EmployeeController ,在Index action 方法中設置FooterData 屬性值,如下:
1: public ActionResult Index()
2: {
3: ...
4: ...
5: employeeListViewModel.FooterData = new FooterViewModel();
6: employeeListViewModel.FooterData.CompanyName = "StepByStepSchools";//Can be set to dynamic value
7: employeeListViewModel.FooterData.Year = DateTime.Now.Year.ToString();
8: return View("Index", employeeListViewModel);
9: }
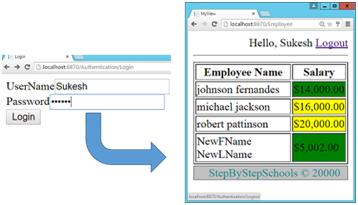
6. 顯示Footer
打開Index.cshtml 文件,在Table 標簽后顯示Footer 分部View,如下:
1: </table>
2: @{
3: Html.RenderPartial("Footer", Model.FooterData);
4: }
5: </div>
6: </body>
7: </html>
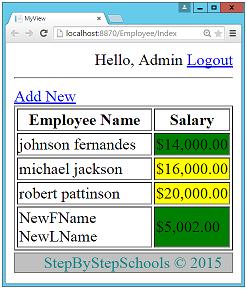
7. 運行,打開Index View

關于實驗22
Html.Partial的作用是什么?與Html.RenderPartial區別是什么?
與Html.RenderPartial作用相同,Html.Partial會在View 中用來顯示分部View。
Html.RenderPartial會將分部View的結果直接寫入HTTP 響應流中,而 Html.Partial會返回 MvcHtmlString值。
什么是MvcHtmlString,為什么 Html.Partial返回的是MvcHtmlString 而不是字符串?
根據MSDN規定,”MvcHtmlString”代表了一個 HTML編碼的字符串,不需要二次編碼。代碼如下:
1: @{
2: string MyString = "My Simple String";
3: }
4: @MyString
以上代碼會轉換為:

Razor顯示了全部的內容,許多人會認為已經看到加粗的字符串,是Razor Html在顯示內容之前將內容編碼,這就是為什么使用純內容來代替粗體。
當不適用razor編碼時,使用 MvcHtmlString,MvcHtmlString是razor的一種表示,即“字符串已經編碼完畢,不需要其他編碼”。
如:
1: @{
2: string MyString = "My Simple String";
3: }
4: @MvcHtmlString.Create(MyString)
輸出:

Html.RenderAction 和 Html.Action兩者之間有什么不同?更推薦使用哪種方法?
Html.RenderAction會將Action 方法的執行結果直接寫入HTTP 響應請求流中,而 Html.Action會返回MVC HTML 字符串。更推薦使用Html.RenderAction,因為它更快。當我們想在顯示前修改action執行的結果時,推薦使用Html.Action。
實驗23——實現用戶角色管理
在實驗23中我們將實現管理員和非管理員登錄的功能。需求很簡單:非管理員用戶沒有創建新Employee的權限。實驗23會幫助大家理解MVC提供的Session 和Action過濾器。
因此我們將實驗23分為兩部分:
第一部分:非管理員用戶登錄時,隱藏 Add New 鏈接
1. 創建標識用戶身份的枚舉類型
右擊Model 文件夾,選擇添加新項目。選擇“Code File”選項。
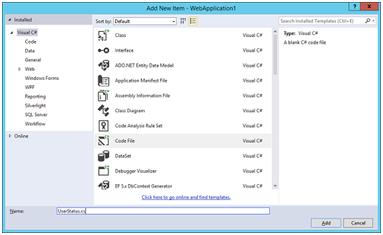
輸入“UserStatus”名,點擊添加。
“Code File”選項會創建一個“.cs”文件.
創UserStatus枚舉類型,如下:
1: namespace WebApplication1.Models
2: {
3: public enum UserStatus
4: {
5: AuthenticatedAdmin,
6: AuthentucatedUser,
7: NonAuthenticatedUser
8: }
9: }
2. 修改業務層功能
刪除 IsValidUser函數,創建新函數“GetUserValidity“,如下:
1: public UserStatus GetUserValidity(UserDetails u)
2: {
3: if (u.UserName == "Admin" && u.Password == "Admin")
4: {
5: return UserStatus.AuthenticatedAdmin;
6: }
7: else if (u.UserName == "Sukesh" && u.Password == "Sukesh")
8: {
9: return UserStatus.AuthentucatedUser;
10: }
11: else
12: {
13: return UserStatus.NonAuthenticatedUser;
14: }
15: }
3. 修改DoLogin action方法
打開 AuthenticationController, 修改DoLogin action:
1: [HttpPost]
2: public ActionResult DoLogin(UserDetails u)
3: {
4: if (ModelState.IsValid)
5: {
6: EmployeeBusinessLayer bal = new EmployeeBusinessLayer();
7: //New Code Start
8: UserStatus status = bal.GetUserValidity(u);
9: bool IsAdmin = false;
10: if (status==UserStatus.AuthenticatedAdmin)
11: {
12: IsAdmin = true;
13: }
14: else if (status == UserStatus.AuthentucatedUser)
15: {
16: IsAdmin = false;
17: }
18: else
19: {
20: ModelState.AddModelError("CredentialError", "Invalid Username or Password");
21: return View("Login");
22: }
23: FormsAuthentication.SetAuthCookie(u.UserName, false);
24: Session["IsAdmin"] = IsAdmin;
25: return RedirectToAction("Index", "Employee");
26: //New Code End
27: }
28: else
29: {
30: return View("Login");
31: }
32: }
在上述代碼中,已經出現Session 變量來識別用戶身份。
什么是Session?
Session是Asp.Net的特性之一,可以在MVC中重用,可用于暫存用戶相關數據,session變量周期是穿插于整個用戶生命周期的。
4. 移除存在的 AddNew 鏈接
打開“~/Views/Employee”文件夾下 Index.cshtml View,移除”Add New“超鏈接。
<!-- Remove following line from Index.cshtml -->

<a  href="/Employee/AddNew">Add New</a>
5. 創建分部View
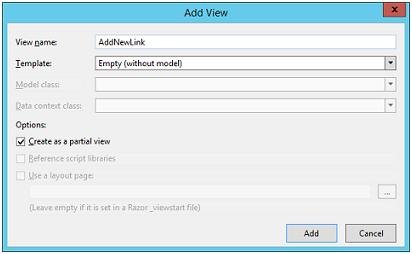
右擊“~/Views/Employee”文件夾,選擇添加View,設置View名稱”“AddNewLink”“,選中”Create a partial View“復選框。
6. 輸入分部View的內容
在新創建的分部視圖中輸入以下內容:
<a href="/Employee/AddNew">Add New</a>
7. 新建 Action 方法
打開 EmployeeController,新建Action 方法”GetAddNewLink“,如下:
1: public ActionResult GetAddNewLink()
2: {
3: if (Convert.ToBoolean(Session["IsAdmin"]))
4: {
5: return Partial View("AddNewLink");
6: }
7: else
8: {
9: return new EmptyResult();
10: }
11: }
8. 顯示 AddNew 鏈接
打開 Index.html,輸入以下代碼:
1: <a href="/Authentication/Logout">Logout</a>
2: </div>
3: <hr />
4: @{
5: Html.RenderAction("GetAddNewLink");
6: }
7: <div>
8: <table border="1">
9: <tr>
Html.RenderAction 執行Action 方法,并將結果直接寫入響應流中。
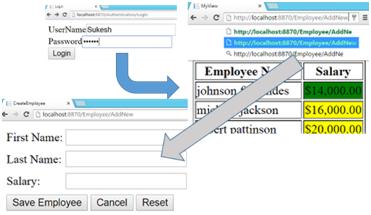
9. 運行
測試1
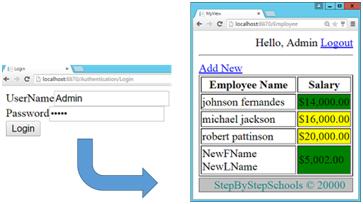
測試2
第二部分: 直接URL 安全
以上實驗實現了非管理員用戶無法導航到AddNew鏈接。這樣還不夠,如果非管理員用戶直接輸入AddNew URL,則會直接跳轉到此頁面。
非管理員用戶還是可以直接訪問AddNew方法,為了解決這個問題,我們會引入MVC action 過濾器。Action 過濾器使得在action方法中添加一些預處理和后處理的邏輯判斷問題。在整個實驗中,會注重ActionFilters預處理的支持和后處理的功能。
1. 安裝過濾器
新建文件夾Filters,新建類”AdminFilter“。
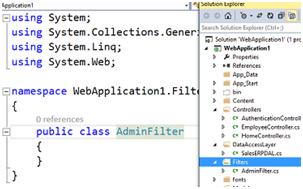
2. 創建過濾器
通過繼承 ActionFilterAttribute ,將 AdminFilter類升級為”ActionFilter“,如下:
1: public class AdminFilter:ActionFilterAttribute
2: {
3:
4: }
注意:使用”ActionFilterAttribute “需要在文件頂部輸入”System.Web.Mvc“。
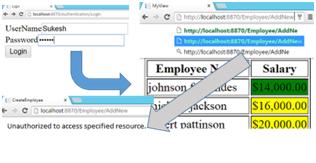
3. 添加安全驗證邏輯
在ActionFliter中重寫 OnActionExecuting方法:
1: public override void OnActionExecuting(ActionExecutingContext filterContext)
2: {
3: if (!Convert.ToBoolean(filterContext.HttpContext.Session["IsAdmin"]))
4: {
5: filterContext.Result = new ContentResult()
6: {
7: Content="Unauthorized to access specified resource."
8: };
9: }
10: }
4. 綁定過濾器
在AddNew和 SaveEmployee方法中綁定過濾器,如下:
1: [AdminFilter]
2: public ActionResult AddNew()
3: {
4: return View("CreateEmployee",new Employee());
5: }
6: ...
7: ...
8: [AdminFilter]
9: public ActionResult SaveEmployee(Employee e, string BtnSubmit)
10: {
11: switch (BtnSubmit)
12: {
13: case "Save Employee":
14: if (ModelState.IsValid)
15: {
16: EmployeeBusinessLayer empBal = new EmployeeBusinessLayer();
17: ....
18: ....
5. 運行
關于實驗23
可以通過瀏覽器直接調用GetAddNewLink方法嗎?
可以直接調用,也可直接停止”GetAddNewLink“的運行。
Html.Action有什么作用?
與Html.RenderAction作用相同,Html.Action會執行action 方法,并在View中顯示結果。
語法:
1: @Html.Action("GetAddNewLink");
Html.RenderAction 和 Html.Action兩者之間有什么不同?更推薦使用哪種方法?
Html.RenderAction會將Action 方法的執行結果直接寫入HTTP 響應請求流中,而 Html.Action會返回MVCHTMLString。更推薦使用Html.RenderAction,因為它更快。當我們想在顯示前修改action執行的結果時,推薦使用Html.Action。
什么是 ActionFilter ?
與AuthorizationFilter類似,ActionFilter是ASP.NET MVC過濾器中的一種,允許在action 方法中添加預處理和后處理邏輯。
實驗24——實現項目外觀的一致性
在ASP.NET能夠保證外觀一致性的是母版頁的使用。MVC卻不同于ASP.NET,在RAZOR中,母版頁稱為布局頁面。
在開始實驗之前,首先來了解布局頁面
1. 帶有歡迎消息的頁眉
2. 帶有數據的頁腳
最大的問題是什么?
帶有數據的頁腳和頁眉作為ViewModel的一部分傳從Controller傳給View。
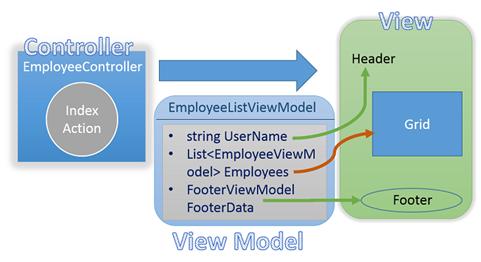
現在最大的問題是在頁眉和頁腳移動到布局頁面后,如何將數據從View傳給Layout頁面。
解決方案——繼承
可使用繼承原則,通過實驗來深入理解。
1. 創建ViewModel基類
在ViewModel 文件夾下新建ViewModel 類 ”BaseViewModel“,如下:
1: public class BaseViewModel
2: {
3: public string UserName { get; set; }
4: public FooterViewModel FooterData { get; set; }//New Property
5: }
BaseViewModel可封裝布局頁所需要的所有值。
2. 準備 EmployeeListViewModel
刪除EmployeeListViewModel類的 UserName和 FooterData屬性,并繼承 BaseViewModel:
1: public class EmployeeListViewModel:BaseViewModel
2: {
3: public List<EmployeeViewModel> Employees { get; set; }
4: }
3. 創建布局頁面
右擊shared文件夾,選擇添加>>MVC5 Layout Page。輸入名稱”MyLayout“,點擊確認
1: <!DOCTYPE html>
2:
3: <html>
4: <head>
5: <meta name="viewport" content="width=device-width" />
6: <title>@ViewBag.Title</title>
7: </head>
8: <body>
9: <div>
10: @RenderBody()
11: </div>
12: </body>
13: </html>
4. 將布局轉換為強類型布局
1: @using WebApplication1.ViewModels
2: @model BaseViewModel
5. 設計布局頁面
在布局頁面添加頁眉,頁腳和內容,內容,三部分,如下:
1: <html>
2: <head>
3: <meta name="viewport" content="width=device-width" />
4: <title>@RenderSection("TitleSection")</title>
5: @RenderSection("HeaderSection",false)
6: </head>
7: <body>
8: <div style="text-align:right">
9: Hello, @Model.UserName
10: <a href="/Authentication/Logout">Logout</a>
11: </div>
12: <hr />
13: <div>
14: @RenderSection("ContentBody")
15: </div>
16: @Html.Partial("Footer",Model.FooterData)
17: </body>
18: </html>
如上所示,布局頁面包含三部分,TitleSection, HeaderSection 和 ContentBody,內容頁面將使用這些部分來定義合適的內容。
6. 在 Index View中綁定布局頁面
打開Index.cshtml,在文件頂部會發現以下代碼:
1: @{
2: Layout = null;
3: }
修改:
1: @{
2: Layout = "~/Views/Shared/MyLayout.cshtml";
3: }
7.設計Index View
- 從Index View中去除頁眉和頁腳
- 在Body標簽中復制保留的內容,并存放在某個地方。
- 復制Title標簽中的內容
- 移除View中所有的HTML 內容,確保只移動了HTML,@model 且沒有移動layout語句
- 在復制的內容中定義TitleSection和 Contentbody
完整的View代碼如下:
1: @using WebApplication1.ViewModels
2: @model EmployeeListViewModel
3: @{
4: Layout = "~/Views/Shared/MyLayout.cshtml";
5: }
6:
7: @section TitleSection{
8: MyView
9: }
10: @section ContentBody{
11: <div>
12: @{
13: Html.RenderAction("GetAddNewLink");
14: }
15: <table border="1">
16: <tr>
17: <th>Employee Name</th>
18: <th>Salary</th>
19: </tr>
20: @foreach (EmployeeViewModel item in Model.Employees)
21: {
22: <tr>
23: <td>@item.EmployeeName</td>
24: <td style="background-color:@item.SalaryColor">@item.Salary</td>
25: </tr>
26: }
27: </table>
28: </div>
29: }
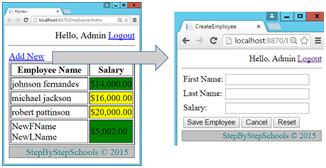
8. 運行
9. 在 CreateEmployee 中綁定布局頁面
打開 Index.cshtml,修改頂部代碼:
1: @{
2: Layout = "~/Views/Shared/MyLayout.cshtml";
3: }
10. 設計 CreateEmployee View
與第7步中的程序類似,定義 CreateEmployee View中的Section ,在本次定義中只添加一項,如下:
1: @using WebApplication1.Models
2: @model Employee
3: @{
4: Layout = "~/Views/Shared/MyLayout.cshtml";
5: }
6:
7: @section TitleSection{
8: CreateEmployee
9: }
10:
11: @section HeaderSection{
12: <script src="~/Scripts/Validations.js"></script>
13: <script>
14: function ResetForm() {
15: document.getElementById('TxtFName').value = "";
16: document.getElementById('TxtLName').value = "";
17: document.getElementById('TxtSalary').value = "";
18: }
19: </script>
20: }
21: @section ContentBody{
22: <div>
23: <form action="/Employee/SaveEmployee" method="post" id="EmployeeForm">
24: <table>
25: <tr>
26: <td>
27: First Name:
28: </td>
29: <td>
30: <input type="text" id="TxtFName" name="FirstName" value="@Model.FirstName" />
31: </td>
32: </tr>
33: <tr>
34: <td colspan="2" align="right">
35: @Html.ValidationMessage("FirstName")
36: </td>
37: </tr>
38: <tr>
39: <td>
40: Last Name:
41: </td>
42: <td>
43: <input type="text" id="TxtLName" name="LastName" value="@Model.LastName" />
44: </td>
45: </tr>
46: <tr>
47: <td colspan="2" align="right">
48: @Html.ValidationMessage("LastName")
49: </td>
50: </tr>
51:
52: <tr>
53: <td>
54: Salary:
55: </td>
56: <td>
57: <input type="text" id="TxtSalary" name="Salary" value="@Model.Salary" />
58: </td>
59: </tr>
60: <tr>
61: <td colspan="2" align="right">
62: @Html.ValidationMessage("Salary")
63: </td>
64: </tr>
65:
66: <tr>
67: <td colspan="2">
68:
69: <input type="submit" name="BtnSubmit" value="Save Employee" onclick="return IsValid();" />
70: <input type="submit" name="BtnSubmit" value="Cancel" />
71: <input type="button" name="BtnReset" value="Reset" onclick="ResetForm();" />
72: </td>
73: </tr>
74: </table>
75: </div>
76: }
11. 運行
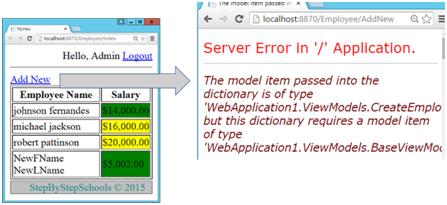
Index View是 EmployeeListViewModel類型的強View類型,是 BaseViewModel的子類,這就是為什么Index View可一直發揮作用。CreateEmployee View 是CreateEmployeeViewModel的強類型,并不是BaseViewModel的子類,因此會出現以上錯誤。
12. 準備 CreateEmployeeViewModel
使CreateEmployeeViewModel 繼承 BaseViewModel,如下:
1: public class CreateEmployeeViewModel:BaseViewModel
2: {
3: ...
13. 運行
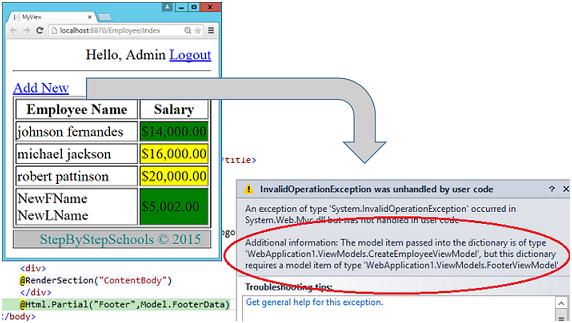
報錯,該錯誤好像與步驟11中的錯誤完全不同,出現這些錯誤的根本原因是未初始化AddNew action方法中的Header和Footer數據。
14. 初始化Header和Footer 數據
修改AddNew方法:
1: public ActionResult AddNew()
2: {
3: CreateEmployeeViewModel employeeListViewModel = new CreateEmployeeViewModel();
4: employeeListViewModel.FooterData = new FooterViewModel();
5: employeeListViewModel.FooterData.CompanyName = "StepByStepSchools";//Can be set to dynamic value
6: employeeListViewModel.FooterData.Year = DateTime.Now.Year.ToString();
7: employeeListViewModel.UserName = User.Identity.Name; //New Line
8: return View("CreateEmployee", employeeListViewModel);
9: }
15. 初始化 SaveEmployee中的Header和 FooterData
1: public ActionResult SaveEmployee(Employee e, string BtnSubmit)
2: {
3: switch (BtnSubmit)
4: {
5: case "Save Employee":
6: if (ModelState.IsValid)
7: {
8: ...
9: }
10: else
11: {
12: CreateEmployeeViewModel vm = new CreateEmployeeViewModel();
13: ...
14: vm.FooterData = new FooterViewModel();
15: vm.FooterData.CompanyName = "StepByStepSchools";//Can be set to dynamic value
16: vm.FooterData.Year = DateTime.Now.Year.ToString();
17: vm.UserName = User.Identity.Name; //New Line
18: return View("CreateEmployee", vm); // Day 4 Change - Passing e here
19: }
20: case "Cancel":
21: return RedirectToAction("Index");
22: }
23: return new EmptyResult();
24: }
16. 運行

關于實驗24
RenderBody 有什么作用?
之前創建了Layout 頁面,包含一個Razor語句如:
1: @Html.RenderBody()
首先我們先來了RenderBody是用來做什么的?
在內容頁面,通常會定義Section,聲明Layout頁面。但是奇怪的是,Razor允許定義在Section外部定義一些內容。所有的非section內容會使用RenderBody函數來渲染,下圖能夠更好的理解:

布局是否可嵌套?
可以嵌套,創建Layout頁面,可使用其他存在的Layout頁面,語法相同。
是否需要為每個View定義Layout頁面?
會在View文件夾下發現特殊的文件“__ViewStart.cshtml”,在其內部的設置會應用所有的View。
例如:在__ViewStart.cshtml中輸入以下代碼,并給所有View 設置 Layout頁面。
1: @{
2: Layout = "~/Views/Shared/_Layout.cshtml";
3: }
是否在每個Action 方法中需要加入Header和Footer數據代碼?
不需要,可在Action 過濾器的幫助下刪除重復的代碼。
是否強制定義了所有子View中的Section?
是的,如果Section定義為需要的section,默認的值會設置為true。如下
1: @RenderSection("HeaderSection",false) // Not required
2: @RenderSection("HeaderSection",true) // required
3: @RenderSection("HeaderSection") // required
實驗25——使用Action Fliter讓Header和Footer數據更有效
在實驗23中,我們已經知道了使用 ActionFilter的一個優點,現在來看看使用 ActionFilter的其他好處
1. 刪除Action 方法中的冗余代碼
刪除Index,AddNew, SaveEmployee方法中的Header和Footer數據代碼。
Header代碼如:
1: bvm.UserName = HttpContext.Current.User.Identity.Name;
Footer代碼如:
1: bvm.FooterData = new FooterViewModel();
2: bvm.FooterData.CompanyName = "StepByStepSchools";//Can be set to dynamic value
3: bvm.FooterData.Year = DateTime.Now.Year.ToString();
2.創建HeaderFooter 過濾器
在Filter文件夾下新建類”HeaderFooterFilter“,并通過繼承ActionFilterAttribute類升級為Action Filter
3. 升級ViewModel
重寫 HeaderFooterFilter類的 OnActionExecuted方法,在該方法中獲取當前View Model ,并綁定Header和Footer數據。
1: public class HeaderFooterFilter : ActionFilterAttribute
2: {
3: public override void OnActionExecuted(ActionExecutedContext filterContext)
4: {
5: ViewResult v = filterContext.Result as ViewResult;
6: if(v!=null) // v will null when v is not a ViewResult
7: {
8: BaseViewModel bvm = v.Model as BaseViewModel;
9: if(bvm!=null)//bvm will be null when we want a view without Header and footer
10: {
11: bvm.UserName = HttpContext.Current.User.Identity.Name;
12: bvm.FooterData = new FooterViewModel();
13: bvm.FooterData.CompanyName = "StepByStepSchools";//Can be set to dynamic value
14: bvm.FooterData.Year = DateTime.Now.Year.ToString();
15: }
16: }
17: }
18: }
4. 綁定過濾器
在Index中,AddNew,SaveEmployee的action 方法中綁定 HeaderFooterFilter
1: [HeaderFooterFilter]
2: public ActionResult Index()
3: {
4: EmployeeListViewModel employeeListViewModel = new EmployeeListViewModel();
5: ...
6: }
7: ...
8: [AdminFilter]
9: [HeaderFooterFilter]
10: public ActionResult AddNew()
11: {
12: CreateEmployeeViewModel employeeListViewModel = new CreateEmployeeViewModel();
13: //employeeListViewModel.FooterData = new FooterViewModel();
14: //employeeListViewModel.FooterData.CompanyName = "StepByStepSchools";
15: ...
16: }
17: ...
18: [AdminFilter]
19: [HeaderFooterFilter]
20: public ActionResult SaveEmployee(Employee e, string BtnSubmit)
21: {
22: switch (BtnSubmit)
23: {
24: ...
5. 運行
總結
本文主要介紹了ASP.NET MVC中頁眉頁腳的添加和Layout頁面的使用,并實現了用戶角色分配及Action Filter的使用,下一節中我們將是最難和最有趣的一篇,請持續關注吧!
在學習了本節Layout頁面及用戶角色管理之后,你是否也躍躍欲試想要進行MVC開發?不妨試試 ComponentOne Studio ASP.NET MVC 這款輕量級控件,它與Visual Studio無縫集成,完全與MVC6和ASP.NET 5.0兼容,將大幅提高工作效率.
原文鏈接:http://www.codeproject.com/Articles/1000435/Learn-MVC-Project-in-days-Day
相關閱讀:
文章列表

請先 登入 以發表留言。